Using your own cloud storage for request handling
When processing data subject requests, MineOS might need to collect and generate data as part of the process. By default, the data is being stored temporarily in MineOS. Setting custom storage allows you to use your own storage, from a list of supported systems. Using your own storage allows you to have more control and keep the data managed by you.
| MineOS Default Storage | Your own storage | |
| Location | EU | Managed by you. |
| Retention Period | Fixed to 30 days | Managed by you. |
| Managed By | MineOS | Managed by you. |
Using your own storage with Google Cloud Storage
Step 1: Creating and setting up the storage bucket
Whether you are using an existing storage bucket, or creating a new one for this purpose, here are a few best practices to follow for a correct setup:
- Use multi-region or dual-region for high availability.
- Use Standard storage class.
- Use uniform bucket ACL.
- Disable versioning (this is important for compliance).
- Use a retention policy, and have it set for 30 days or more.
- Configure CORS to allow access from your privacy center.
Bucket Permissions:
- Open Cloud Storage on your Google Cloud Console.
- From the top bar choose the project with the bucket you'd like to use.
- On the Cloud Storage page, choose the storage bucket you would like to use.
- Inside the storage bucket go to Permissions and click Grant Access
- Paste your MineOS principal account ID. This is shown on the DSR Storage setup page after selecting Custom and Google Cloud as the provider.
- Under Assign roles, add the following roles:
- Storage Admin (under Resource Manager)
- Storage Admin (under Resource Manager)
- Click Save
Note:
- MineOS requires a Storage Admin role to correctly set the bucket's CORS policy.
- MineOS only manages bucket objects, and will not modify any other settings such as lifecycle, permissions, policies, etc.
Step 2: Setup in MineOS
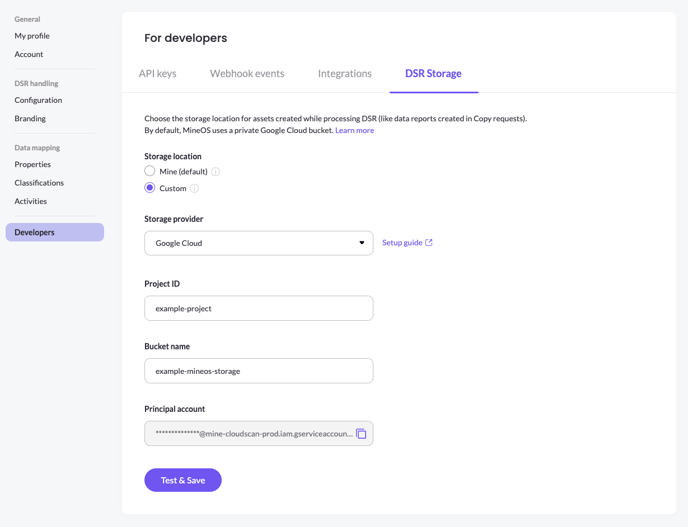
- Go to the DSR Storage page in your MineOS account (under Settings -> Developers).
- Select "Custom".
- Select "Google Cloud" as the storage provider.
- Enter the project ID and bucket name
- Click Test & Save. MineOS will now check the bucket selected can properly be connected to, and has the required permissions.

Caution: Do not edit or change existing requests regarding file or data attachments as these will adhere to the new DSR storage configuration.
