
Integrate with S3 to perform automated content classification on your buckets
About the Amazon AWS S3 Integration
What it does:
- Performs content scanning on objects in an S3 Bucket to detect and map the types of data that are stored inside of it.
- The integration supports scanning and identifying data types inside many different file and document types. For more information, see below.
Before setting up this integration:
- Be sure to add Amazon S3 to your Inventory. To learn how to add systems to your Inventory, click here.
- Make sure your MineOS plan supports automatic integrations.
How to set up
On AWS - Create a role for MineOS to assume
- Log into your AWS account
- Go to IAM -> Roles -> Create Role
- Under Trusted entity type choose AWS account
- Choose Another AWS account and enter the account ID 595379680669
- Under Options, mark Require External ID and choose your external ID secret.
Make sure to remember your external ID for connecting the integration in MineOS later on.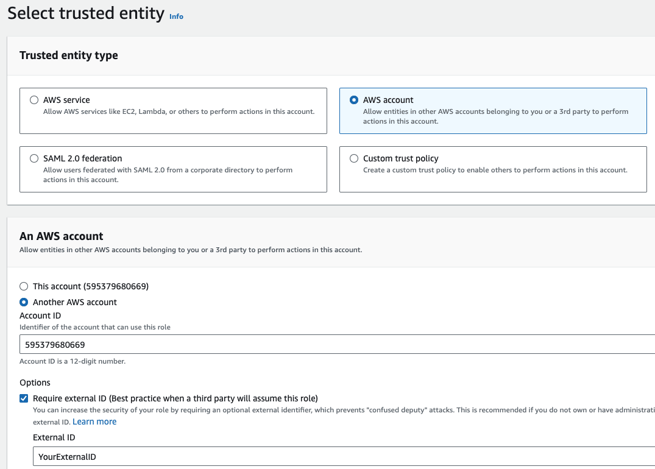
- Click Next
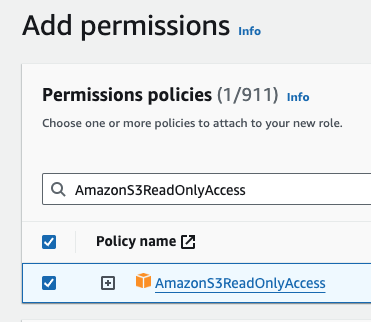
- Under Add Permissions add the AmazonS3ReadOnlyAccess policy
- Click Next
- Add your Role Name, Description
- Click Create Role
Notes:
- The AWS S3 integration requires the s3:ListAllMyBuckets permission.
- Encrypted buckets require the kms:Decrypt permission which is not part of the AmazonS3ReadOnlyAcess policy. Encrypted buckets will be skipped without this permission set.
If you already have a MineOS role to assume simply add the policy to the existing role
On your Privacy Portal:
- Head to your Data Inventory and select Amazon AWS S3
- Scroll down to the area titled Request handling
- Select Scan this source using Data Classifier
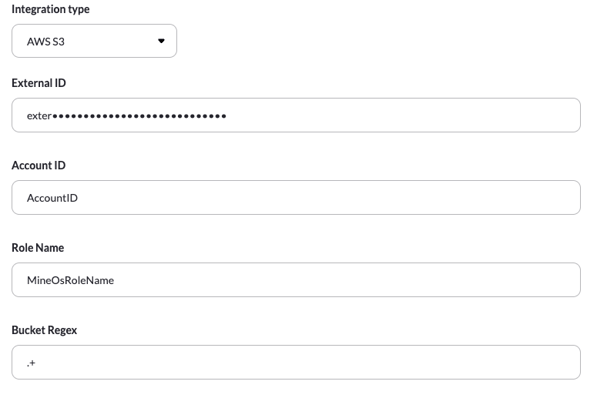
- Select Integration as the handling style
- Paste your External ID, Account ID, Role Name, and Bucket Regex.
- Under Bucket Regex type a bucket name or regular expressions to match the bucket names you want to scan. Here are a few examples of using regular expressions for scanning multiple buckets:
- .+ will scan all the buckets the user account has access to.
- prod-.+ will scan all the buckets that start with "prod-".
- .+-data will scan all the buckets that end with "-data".
- Click Test your integration so MineOS can verify your settings and save them. Once you do, the bucket names that match the regex will appear. Verify the buckets are as you intended:

- If successful, click Test & save" to enable the integration.
If you would like to add more buckets or more regexes, click the "+ Create Instance" link at the bottom and type in another bucket name or a regex. You can reuse the same external ID, account ID & role name.
Supported File Types
Mine's content classification supports the following file types by extracting text from the files and performing classification:
- Apache Avro (.avro) - There are limits on maximum block size, file size, number of columns etc.
- Apache Parquet (.parquet)
- .csv .tsv
- PDF - File size limit: 30MB
- Textual files
- Microsoft Word - File size limit: 30MB
- Microsoft Excel - File size limit: 30MB
- Microsoft Powerpoint - File size limit: 30MB
- Image files - using OCR.
Other file types not listed are not supported, including:
- Archives - support is coming soon.
Limitations
- "Requestor pays" buckets are not supported.
- Buckets or objects with Glacier Flexible or Glacier Deep Archive storage class are not supported, they will be skipped. Glacier Instant storage class is supported.
- Compressed objects (gzip) are not currently supported, although support is coming soon.
Talk to us if you need any help with integrations via our chat or at portal@saymine.com, and we'll be happy to assist!🙂